Rick's b.log - entry 2014/11/23 |
| ||||||
mailto: blog -at- heyrick -dot- eu
You are not reading my b.log using HTTPS. You can switch to HTTPS by clicking here. Micro helicopterSo I was looking around the end-of-line-or-reject-stuff shop the other day when I saw a little model helicopter for... what was it, six or seven euros? Cheap enough to have some fun with. It was probably here because the USB charging lead was missing. My box hadn't been tampered with, perhaps an incorrect batch? This wasn't critical as the remote controller has a built-in charger too.This is the baby of the family - barely larger than my hand. Here is an "epic angle" shot to make it look a lot larger than it really is.  From an engineering point of view, it is quite a marvel. It may be a mere toy, but to create a functional helicopter in this sort of size is quite astonishing. Here is a photo of the insides, and you can see the battery looks and feels like an electrolytic capacitor, while the motor appears to be about the same sort of size as the tiny surface-mount chip. Yup, that's one of the drive motors, this one powering the lower blade. 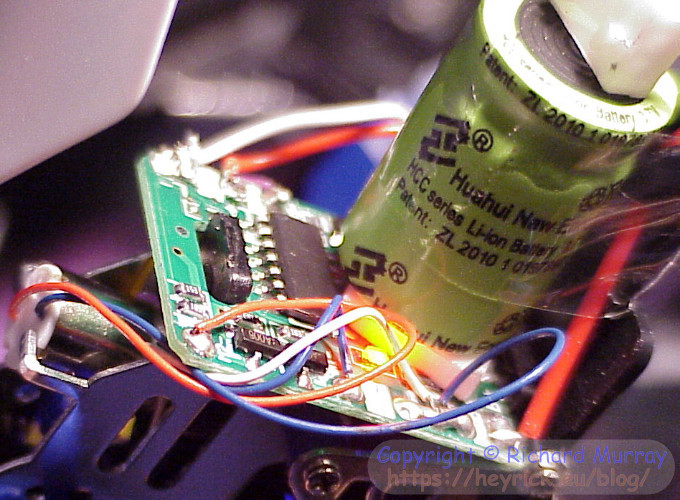 There are three motors, as in most helicopters of this design. One for the upper blades, one for the lower blades, and one - even dinkier - for the tail blade. Here's a photo of the tail blade motor next to a tripe-A (AAA) cell. 
The basic operation of flight is quite simple. A rotor turns which pushes air down. The air forced down causes the craft to rise. In a real helicopter, you normally only have one set of blades on top, either two or four depending upon aircraft type. If this was all you had, the helicopter would just spin and spin until it crashed. Here is a YouTube video of a helicopter not surviving a tail rotor failure. And, well, that's basically it.
I only flew this helicopter a couple of times, as with my first craft, wind is a problem. Because this model is so tiny, slight breezes are a problem. However, the one thing that insantly stood out for me is the behaviour of the "gyro". Unlike my original helicopter, this one contains a little device inside to keep the tail steady. If you recall from my previous videos, I spent forever trying to trim the settings of my original model to attempt to keep it steady, however as the battery was used, it would affect the relative speeds of the motors so the model would begin to spin again. Not so here, the micro helicopter rises up and the tail stays put. If it does drift, there is a control to trim that out, but most of the drifting is the breeze pushing the craft around, not the craft itself. My original helicopter was damn near unflyable thanks to its lack of a gyro. This, as cheap and silly as it might seem, offers a better flight experience right from throttle up. It is, and I cannot stress this enough, absolutely at the whim of the elements. Just now I went into the attic over the cow barn. There was still some breeze inside as the wind (quite strong now) could come in under the bottom of the roof - it's a cow ban, it isn't supposed to be sealed. That said, apart from some (a fair bit of) drift, I could turn the craft and make it go forwards and backwards. Easily the best, and most controlled, flight I have ever had with a model helicopter. It also seems to me as if the flight time lasted longer than normal, like maybe 12 or so minutes? That's quite good when you consider the original helicopter managed maybe seven or so. I ought to say it just in case somebody asks - no, I don't have plans to attach a camera to this. Its lifting capacity might stretch to an SD card or two. That's about it. Something to keep in mind is that the model is controlled by infra-red, not radio. For this reason, the top of the controller should always point towards the model. This will give the brightest signal to the receiver. Don't hold the controller upright as some people do for radio control models. Here is why: 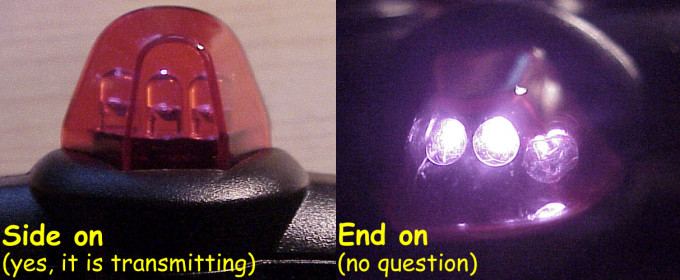
To wrap up, I handed the controls over to mom and recorded the result. She does not know much about flying the helicopter, she controlled the up and down, and the breeze did the rest. The crash at the end was most likely due to the helicopter losing sight of the controller's signals. You can see, even in wind, that the inexpensive "gyro" works hard to keep the craft steady.
Your comments:Please note that while I check this page every so often, I am not able to control what users write; therefore I disclaim all liability for unpleasant and/or infringing and/or defamatory material. Undesired content will be removed as soon as it is noticed. By leaving a comment, you agree not to post material that is illegal or in bad taste, and you should be aware that the time and your IP address are both recorded, should it be necessary to find out who you are. Oh, and don't bother trying to inline HTML. I'm not that stupid! ☺ ADDING COMMENTS DOES NOT WORK IF READING TRANSLATED VERSIONS.
  
(Felicity? Marte? Find out!)
📺 The SIBA stories 📹
It's a simple substring match.
Last read at 11:50 on 2024/04/20.


| ||||||
| Next entry - 2014/11/24 Return to top of page |
| © 2014 Rick Murray |
| Retrieved from http://www.heyrick.co.uk/blog/index.php?diary=20141123 on 20th April 2024 |