Rick's b.log - entry 2014/06/20 |
| ||||||
mailto: blog -at- heyrick -dot- eu
You are not reading my b.log using HTTPS. You can switch to HTTPS by clicking here. Pi Serial portI ordered an Arduino USB to serial port from Amazon. Cheap little thing, you'll find them on eBay too...
It arrived, on its own, with no instructions or driver or anything. I opened it up (simple clip together case) and nearly wept when I saw that it was a (Prolific) PL-2303HX. As it came from China and had a non-standard code on it, and used an Xtal between two "reserved" pins, it was pretty easy to assume that this chip was a clone. Being paranoid, I plugged it into the USB port with the serial end disconnected and probed it with the multimeter. 3.40V. Close enough to 3.3V that no magic smoke will appear. I was also able to determine that the wires are as follows:
The next hurdle was fitting the serial port. If we hold the Pi with the SD card on the left, then the correct locations of the pins on the upper row of the two are: GND is 3rd from the left, TXD (white) is 4th from the left, and RXD (green) is 5th from the left. If your GND is claimed with something else, there is another GND 4th from the right. Unfortunately (for the purposes of fitting this thing), I have a CJE RTC/temp/PWR board which makes fitting the serial pins a little bit harder. As you can see, the CJE board is held in place with two 3×2 headers - the first is for the necessary electrical connections, the other is to add strength so the board doesn't work loose. The serial pins were actually free, not that there was space for both of the serial pins, nor the required clearance. As you can see, I took the approach of bending the Pi's serial GPIO pins slightly and ... well ... pushing. 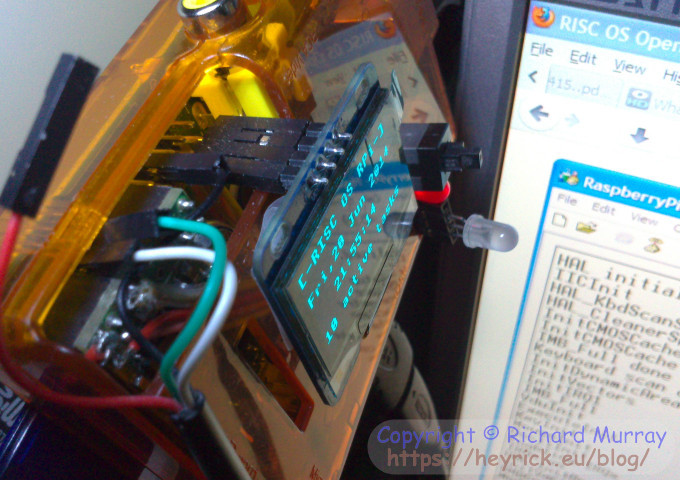 I started up HyperTerminal and it told me it couldn't open COM9. I clicked on the phone icon to 'connect' and it did without an error. Go figure. Then I powered up the Pi. Moment of truth!
All of this happens before anything is written to the screen (you know, the Pi logo and the long list of module inits).HalStartup HalQueryPl 0E100000 007F8000 HalQueryPldone 0E100000 HalStartup2 00008000 00000000 0E000000 ROM start, RAM start, RAM size ROM relocated HalStartup3 .. rst rend 00000000 0DB00000 HalStart from OS 0E000000 02000000 F7000000 HAL Init completed HAL initialised IICInit HAL_KbdScanSetup HAL_CleanerSpace InitCMOSCache entry InitCMOSCache done IMB_Full done Keyboard scan complete InitDynamicAreas InitVectors InitIRQ1 IMB_Full VduInit ExecuteInit KeyInit MouseInit OscliInit Enabling IRQs IRQs on HAL_InitDevices InitVariables AMBControl_Init ModuleInit
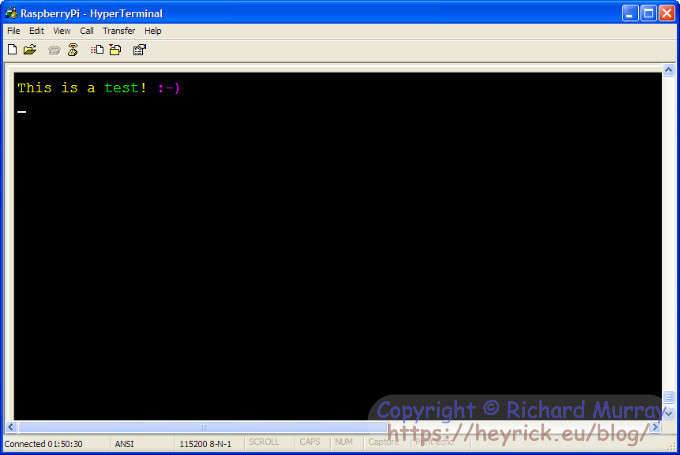
The next step is to send data from the Pi to the terminal on the PC. For some reason, HearSay2 freezes the machine when trying to talk to the serial device (sometimes Alt-Break might get you out of it). I don't really want to use HearSay2 to send data, I'm just mentioning this in case you try it. What you will need is Tank's Pi Serial driver. The OS_SerialOp SWI does not work, and even if it did, sending byte by byte is a bother. At least Tank's module hides this from us so we can just point it at a string and let it do the boring work. Therefore, start up the module, then do this in your program (or the equivalent in your preferred language) before you want to send data: This will reset the serial port, then specify 8N1 at 115.2kbps. These ought to be the defaults, but we'll say it just to be sure.SYS "PiSerial_ResetUART" SYS "PiSerial_Speed",,115200 SYS "PiSerial_Format",,%10000 Then, sending data is a matter of doing the following (assuming buffer% has been DIM'd somewhere prior): The "+2" is because we need a CRLF line ending, but BASIC will consider the CR to be the string terminator.$buffer% = "This is a test!"+CHR$(13)+CHR$(10) SYS "PiSerial_TX",,buffer%,LEN($buffer%)+2
If you are using BASIC - it is strongly recommended to send short individual strings, one at a time. The reason for this is because if you send long multiline texts, you will need to work out some method of determining where the string ends, as LEN() will stop at the first CR. If you are using C, it's a doddle to drop in If you are using HyperTerminal, or a decent terminal, then you ought to be able to get away with using ANSI codes to liven things up. Try this: DIM buffer% 256 esc$=CHR$(27) crlf$=CHR$(13)+CHR$(10) $buffer% = esc$+"[0m"+esc$+"[2J"+esc$+"[1;33mThis is a "+esc$+"[32mtest"+esc$+"[33m! "+esc$+"[35m:-)"+crlf$ SYS "PiSerial_TX",,buffer%,LEN($buffer%)+2
You might wonder why I'm excited to be able to hook a serial port to my PC, given that serial comms are old hat.
There are times (most times, actually) when something initialises in a way that prevents you from splattering rubbish all over the screen. Typically you would use DADebug in this situation, and then issue (sends an 'A')SYS "OS_Hardware",65,,,,,,,,0,86 Sweet. I'll built a serial version tomorrow. ☺
Your comments:Please note that while I check this page every so often, I am not able to control what users write; therefore I disclaim all liability for unpleasant and/or infringing and/or defamatory material. Undesired content will be removed as soon as it is noticed. By leaving a comment, you agree not to post material that is illegal or in bad taste, and you should be aware that the time and your IP address are both recorded, should it be necessary to find out who you are. Oh, and don't bother trying to inline HTML. I'm not that stupid! ☺ ADDING COMMENTS DOES NOT WORK IF READING TRANSLATED VERSIONS.
  
(Felicity? Marte? Find out!)
📺 The SIBA stories 📹
It's a simple substring match.
Last read at 09:03 on 2024/04/20.


| ||||||
| Next entry - 2014/07/05 Return to top of page |
| © 2014 Rick Murray |
| Retrieved from http://www.heyrick.co.uk/blog/index.php?diary=20140620 on 20th April 2024 |